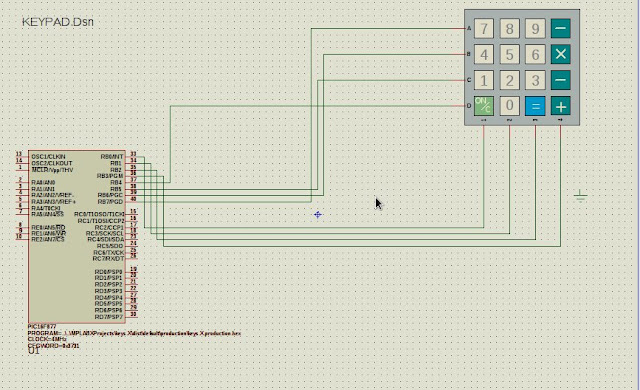
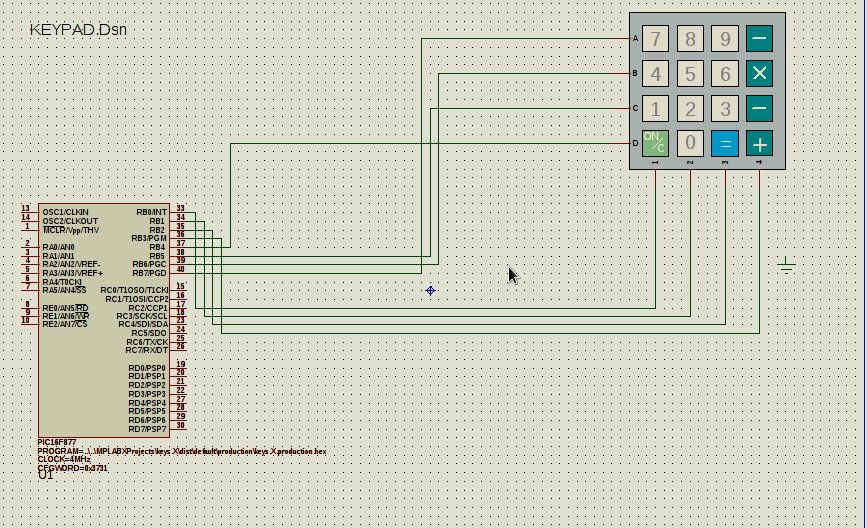
This tutorial will show you how to read a 4x4 keypad input and write to an alphanumeric LCD interfaced to your PIC micro, it's pretty simple and straight forward.

First create a new project and add a c main file like in the steps for Blinking a LED using MPLAB X , PIC16F877A
Components
1.PIC16F877A micro controller
2. 4x4 matrix keypad
initial setup
supply logic 0 (0V or GND) to all 4 keypad row wires or set the row pins as output
Supply logic 1 (high voltage) to all 4 keypad coloum wires or set coloums as input
Steps to read a key from the keypad
1. Find the Row first, by selecting each row
2. scan the colum which pressed key is
3 Find the key pressed ,the function findKey() is for this
PROGRAM
* Author: Ebin Ephrem
*/
char findKey(unsigned int a, unsigned int b);
char readKeyboard();
void main()
{
TRISB = 0xF0;
unsigned int re;
while(1)
{
re=0;
re= readKeyboard();
}
}
char readKeyboard()
{
unsigned int i = 0;
for(i=0;i<4;i++)
{
if(i == 0)
PORTB = 1;
else if(i == 1)
PORTB = 2;
else if(i == 2)
PORTB = 4;
else if(i == 3)
PORTB = 8;
if(RB4)
return findKey(i,0);
if(RB5)
return findKey(i,1);
if(RB6)
return findKey(i,2);
if(RB7)
return findKey(i,3);
}
return ' ';
}
char findKey(unsigned int a, unsigned int b) //generating key character
{
if(b == 0)
{
if(a == 3)
return '3';
else if(a == 2)
return '2';
else if(a == 1)
return '1';
else if(a == 0)
return '0';
}
else if(b == 1)
{
if(a == 3)
return '8';
else if(a == 2)
return '7';
else if(a == 1)
return '6';
else if(a == 0)
return '5';
}
else if(b == 2)
{
if(a == 3)
return 'b';
else if(a == 2)
return '8';
else if(a == 1)
return 'A';
else if(a == 0)
return '-';
}
else if(b == 3)
{
if(a == 3)
return 'C';
else if(a == 2)
return 'U';
else if(a == 1)
return 'E';
else if(a == 0)
return 'F';
}
}
######################################################################
you can modify the number of colums and rows for 3x4 keypad , and for the other keypads

First create a new project and add a c main file like in the steps for Blinking a LED using MPLAB X , PIC16F877A
Components
1.PIC16F877A micro controller
2. 4x4 matrix keypad
initial setup
supply logic 0 (0V or GND) to all 4 keypad row wires or set the row pins as output
Supply logic 1 (high voltage) to all 4 keypad coloum wires or set coloums as input
Steps to read a key from the keypad
1. Find the Row first, by selecting each row
2. scan the colum which pressed key is
3 Find the key pressed ,the function findKey() is for this
4. If we have at least one key pressed, then return from keypadread() will be non zero.
PROGRAM
#######################################################################
/*
* File: main.c* Author: Ebin Ephrem
*/
#include<htc.h>
#if defined(WDTE_OFF)
__CONFIG(WDTE_OFF & LVP_OFF);
#elif defined (WDTDIS)
__CONFIG(WDTDIS & LVPDIS);
#endif
char readKeyboard();
void main()
{
TRISB = 0xF0;
unsigned int re;
while(1)
{
re=0;
re= readKeyboard();
}
}
char readKeyboard()
{
unsigned int i = 0;
for(i=0;i<4;i++)
{
if(i == 0)
PORTB = 1;
else if(i == 1)
PORTB = 2;
else if(i == 2)
PORTB = 4;
else if(i == 3)
PORTB = 8;
if(RB4)
return findKey(i,0);
if(RB5)
return findKey(i,1);
if(RB6)
return findKey(i,2);
if(RB7)
return findKey(i,3);
}
return ' ';
}
char findKey(unsigned int a, unsigned int b) //generating key character
{
if(b == 0)
{
if(a == 3)
return '3';
else if(a == 2)
return '2';
else if(a == 1)
return '1';
else if(a == 0)
return '0';
}
else if(b == 1)
{
if(a == 3)
return '8';
else if(a == 2)
return '7';
else if(a == 1)
return '6';
else if(a == 0)
return '5';
}
else if(b == 2)
{
if(a == 3)
return 'b';
else if(a == 2)
return '8';
else if(a == 1)
return 'A';
else if(a == 0)
return '-';
}
else if(b == 3)
{
if(a == 3)
return 'C';
else if(a == 2)
return 'U';
else if(a == 1)
return 'E';
else if(a == 0)
return 'F';
}
}
######################################################################
you can modify the number of colums and rows for 3x4 keypad , and for the other keypads

0 komentar:
Post a Comment